Posts filed under ‘friends’
Sizzix Triple Play Blog Hop: Peace Banner
Week 6 already! Welcome back to the Triple Play Blog Hop, where 60 designers are giving their takes on the 656053 Sizzix Bigz XL Die – Album, Brackets by Brenda Pinnick.
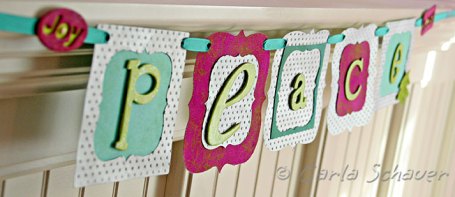
My project this week was one of those projects that morphs along the way into something that ends up very different than how it started looking in my head. First one of the colors change, then another, add a little embossing, take away a little leafing… Until the traditional red/green/gold vertical banner becomes a pink/aqua/lime horizontal banner with 4 extra pieces. What can I say. I’ve never really been a traditional kind of girl anyway.

After I changed my mind a hundred times, I decided on an embossed brushed metal look. The pieces of the album arrived cut out of heavy white cardstock, so I embossed each piece with my Big Shot and the dotted embossing folder, then brushed them with a matte silver acrylic paint.
**Tick-tock-tick-tock-tick-tock–amuse myself by watching paint dry.**
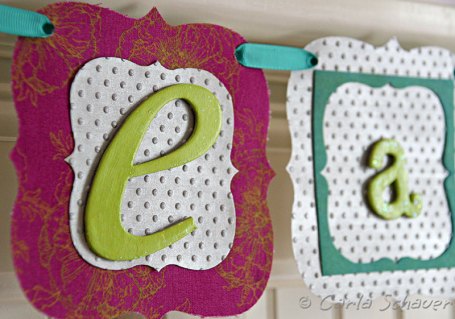
Then, the rest of the project went together pretty quickly. I added aqua cardstock behind the open end album pages, and layered the silver and fabric brackets (from Brenda’s Coulour Vie fabric line from Henry Glass &Co). The thin center bracket frame was hand cut from one of the open album pages and colored using aqua chalk ink.
One of the best things I’ve learned from Brenda is to never be afraid to add bold color, so I chose a bright citron green paint to tie the mismatched chipboard letters together. I used this paint drying time to ink and back the chipboard words I found while rummaging around for my letters, and add an extra hole in the brackets to match the one that came punched in the die-cuts.
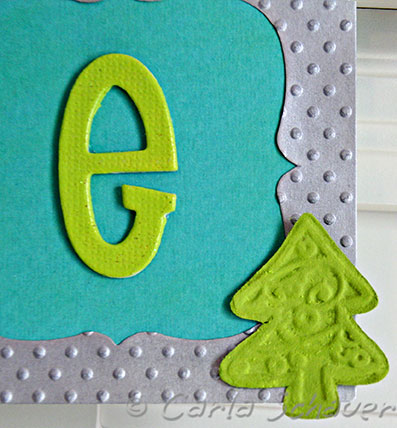
An aqua ribbon laced through the brackets for hanging and an embossed paper tree finished the project. I added the tree using a removable adhesive dot so I can take it off after the holidays and hang the banner in my craft cave. With our family schedule, I could use a little peace year-round!
Thanks for stopping by! Keep hopping using the graphic in the sidebar or check out the main list on the Sizzix blog, and don’t forget to hop with us next week as we finish up the hop with some great treat topper Scoreboards by Eileen Hull.
Until next time…wishing you
C.
Sizzix Triple Play Blog Hop: 2 for 1 Special
Since I drove away last week for the Thanksgiving weekend without my project, or at least a photo of it, I’ll share both projects today. Think of it as a little Black Friday, Cyber Monday, Blog Hop Thursday bonus!
Up today on the Triple Play blog hop is a great little pop-up gift card holder (Sizzix Die #656740) that gives any card an extra bit of fun. The die is designed by Karen Burniston, who I’m convinced has some kind of crazy superhero melding of engineer and craft brains to be able to design the mechanics of these dies, yet still decorate them so beautifully.
This die is all about the inside of the card, so I’ll show what I did with that first.
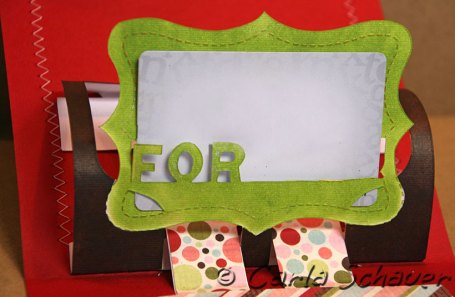
The pieces for this pop-up were cut from white cardstock. I used Clearsnap Chalk Ink in Moss Green and Chestnut to directly ink the cardstock to coordinate with my card. Just for fun, I cut off the “you” portion of the phrase to use later. Then I put it all together using Karen’s handy dandy assembly instructions.
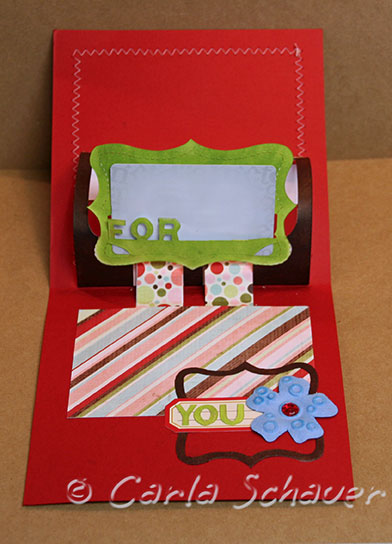
To finish the card, I added dotted paper strips to cover the white tabs of the pop up, and a rectangle of striped paper, leaving a bit of space to write in at the bottom. Karen also sent a spare “front” to use as spare parts. I cut out the bracket frame from the spare piece, inked it in Chestnut, cut it apart, and put it back together in a smaller, vertical format. After layering a small label and a jeweled flower, the “you” part of the die makes it’s reappearance.
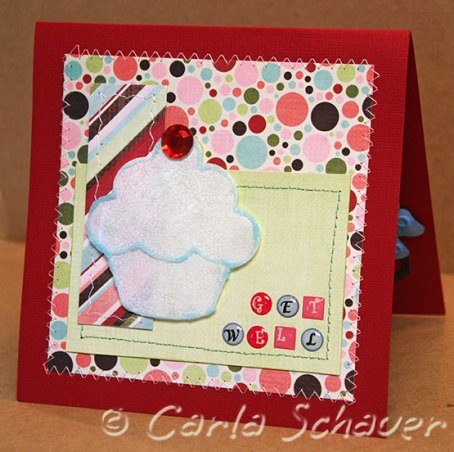
And if you’re curious, here’s the coordinating card front:
As for the second part of today’s two-fer, here’s what I made from Eileen Hull’s Scoreboards Frame Die from last week’s hop: My apologies to Eileen for my spacey moment last week!
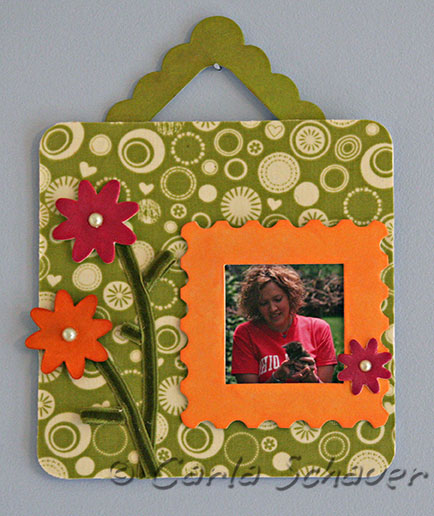
To see how the frame project was created, click here: Sizzix Hanging Frame.
To keep hopping, click the graphic in the sidebar. —–>
Thanks for stopping by!
Until next time…
C.
Sizzix Triple Play Blog Hop:Hanging Frame
I hope you are enjoying the Thanksgiving edition of the Triple Play Blog Hop! Eileen’s frame die is fantastic!
Unfortunately I made a giant Thanksgiving blunder, and after spending time making my project last week I forgot to take a photo of it before I left for the holiday. So my project will be a little late this week. I promise to have it up ASAP after I return.
***********
UPDATE: Here’s the project:

There were so many possibilities with this frame I had a hard time choosing which pieces to use!
I began by using the frame back, and using Mod Podge to decoupage a great funky fabric on top, with an extra coat on top to seal. I love the look of Clearsnap Chalk ink on white matboard, I think it gives a great soft finish. I inked the small postage stamp frame orange, and half of the scalloped frame green. I used Smooch to color the flowers and give them a shimmer.
After the pieces were dry, all that was left was the assembly. Velvet ribbon forms the flower leaves and stems, with half-pearls as the centers. The scalloped frame half is glued to the back side to form the hanger.
Thanks for stopping by, even though I was late!
C.
***********
Use the graphic over here —————————————> to keep hopping!
Until next time…
C.
Sizzix Triple Play Blog Hop–Beauty Bloom
Today’s Sizzix die is Flower, Beauty Bloom # 655455, designed by licensed artist and all-around great person Brenda Pinnick. The flowers can be used individually, layered, flat, curled, whole or split into petals…the options are only limited by imagination!
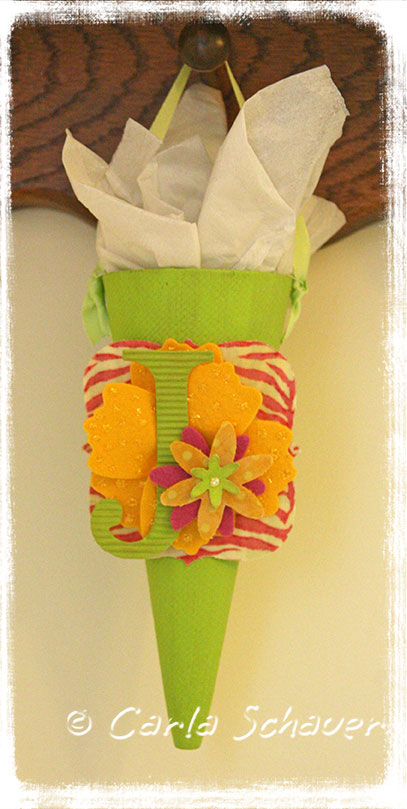
Since my last 2 hop projects had a neutral base, I decided to go with color this week. Lots of color. To make this tussy-mussy-style gift holder, I started by painting the paper-mache cone a bright green (Americana Citron Green, by DecoArt). Brenda was nice enough to send along some die-cut samples of her new fabric line “Couleur Vie” and some of National Non-Woven’s bamboo felt in coordinating colors along with the pieces cut from cardstock. I added a bracket shape cut from Brenda’s fabric and one of her other dies (coming to the hop soon!), and layered two yellow felt flowers that I dotted with gold Stickles.
After painting one of my corrugated kraft letters (Deja Views, love these letters!) in the same green paint, I layered the monogram and additional felt and fabric Beauty Blooms using Helmar’s Liquid Scrap Dots to add dimension and keep the layers level. A ribbon handle finishes the package, which is just the right size for a pair of earrings, candy treats, or other small gift.
Thanks for stopping by!
Keep hopping by using the buttons in the sidebar to the right, or by using the Sizzix blog hop master list. We will be hopping next week on Thanksgiving Day, so be sure to check back after your turkey is gone to see what we create using the Frame Scoreboards die by Eileen Hull.
Until next time…
C.
Sizzix Triple Play Blog Hop Week 2: 3D Twist Cube
What do you do when your kids are fascinated by your Sizzix 3D Twist Cube?
You let them decorate it!
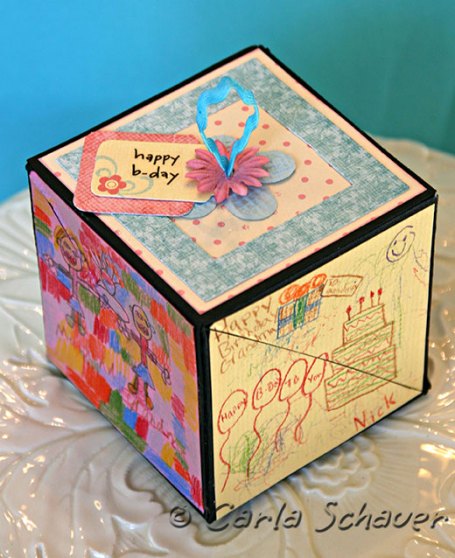
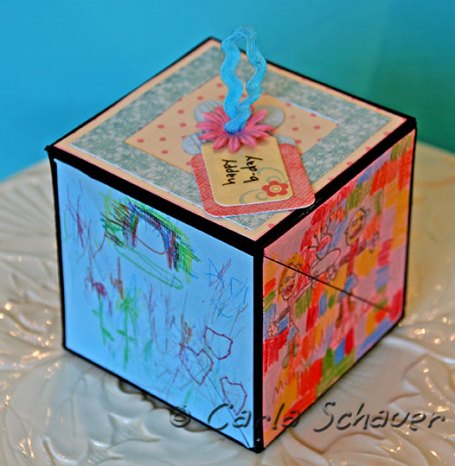
Welcome back to the Triple Play Blog Hop! This week I allowed my kids to lead the way when it came to decorating the project. They love to draw pictures and make cards for their family and friends, and were begging to be the next one to try twisting the cube.
I tend to be a little overprotective of my craft supplies, but I’ve been in a good mood this week. The kids were allowed to shuffle through my patterned paper to decide what would go on top, and each one colored a picture on coordinating DCWV cardstock to celebrate their Grandma’s birthday later this month.
We eventually chose paper with coordinating embellishments from My Mind’s Eye, which we layered with Prima flowers and a Wordsworth sentiment from the deep dark recesses of my stash. Once the kids’ pictures were attached, we were finished!
As much as I love to create detailed, time-intensive crafts, this cube project reminded me that not every project has to be my masterpiece. Sometimes it’s better to let the masterpieces come from little hands and big hearts.
This project uses Karen Burniston’s Sizzix Bigz XL Die – Cube, Twist 3-D (Pop-Up) – #656739. For a complete listing of the designers and their blog links, see the Sizzix Blog Hop master list, or to keep traveling along the hop use the links in the sidebar (top right).
Happy crafting, and happy almost-birthday Mom!
Until next time…
C.
Sizzix Triple Play Blog Hop Week 1: Gingerbread House
Welcome to the Sizzix Triple Play Blog Hop!
Halloween is over, so Christmas is just ahead! Ok, not really. In fact, I have a personal rule about not decorating for Christmas until after Thanksgiving.
Except…when I saw this cute house die designed by my friend Eileen Hull, I knew I had to make it into a gingerbread house. Oh well, rules are made to be broken, right? Happy Thanksgivmas!
For this project, each of us started out with the following Sizzix products:
#65279;Sizzix Scoreboards Pro Die – House, 3D, by Eileen Hull
Sizzix 12×12 matboard, white
Sizzix Big Shot Pro die cutting machine
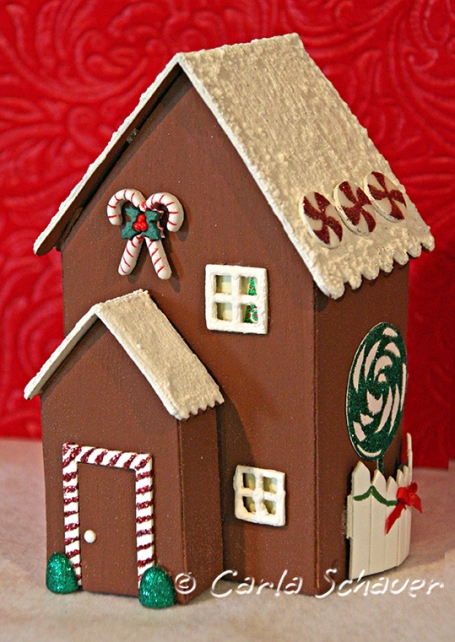
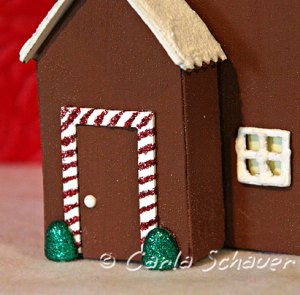
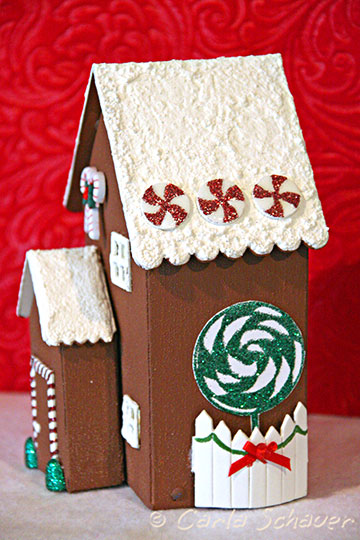
I started by assembling the house base using double sided tape and brads. I like to assemble the Scoreboards dies before painting so I can get the edges covered without touch-ups. I applied two quick coats of a 1:1 mixture of DecoArt Texturizing medium and Americana acrylic paint in Light Cinnamon, leaving the tops of both roof pieces, the fence, windows, and door frame white.
To get a fun faux-snow/icing look to the roof pieces and window frames, I applied Marvy Puffy Velvet Fabric Markers and heat set the pieces when dry. I made the peppermint candies for the roof with a quick swish of white paint on some wooden discs and some red glitter glue, with a coat of Diamond Glaze for a smooth finish. The red glitter glue also added the perfect peppermint touch for the door frame.
Of course I can’t just leave well enough alone, I’m a detail girl. I glued on some premade glittery candy cane and gumdrop buttons, and used one of the brad punch-outs for a doorknob.
The matboard fence made its way over to the side of the house, surrounding a lollipop tree made with white cardstock and Clearsnap’s Design Adhesives. The fence also gets a holiday makeover with a Clearsnap Smooch garland and a tiny red ribbon bow.
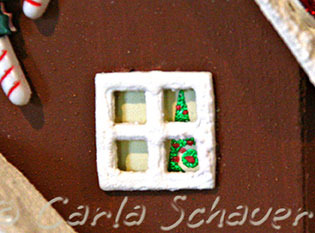
I finished up with some pale yellow cardstock to give a warm glow inside the windowpanes, and an itty bitty foil and Smooch decorated tree peeking out to show some holiday spirit. Did I mention that I love details?
To check out the next of 60 blog hop projects, use the navigation buttons at the top of the sidebar over there ————————>
or use the master list here: Sizzix blog hop master list.
Thanks for hopping by! Tune in next week to see Karin Burniston’s Pop-Up Cube!
Until next time…
C.
Upcycled Bath Salt Gift Basket
Perfect for a cute, casual gift, bath salts are fun to personalize. Many bath salt recipes can be found online, or can be created from a premixed jar found in large hobby stores. There are countless combinations of colors and scents and additives that can be used depending on the recipient’s tastes. For instance, these salts were created using a few drops of a friend’s favorite colors and no scent at all (she is sensitive to scents).
I have many of these small embellishment jars left from reorganizing my craft flower stash, and they are perfect for giving this type of gift. I mix the salts, colors and scents in a small plastic bowl, allow them to dry, then add to a thoroughly washed jar. Wrapped with hemp cord, they make great upcycled containers!
To add a little more pizazz to the gift, I tied a long piece of scrap fabric around the outside of a kraft-colored, take-out-style container, securing with a few dots of Beacon’s Fabri-Tac Glue.
The tag was fashioned from a thin wood veneer (Midwest Products), cut with the Tags #3 die and my trusty Sizzix Big Shot Machine, and inked with Clearsnap Chalk ink in Chestnut Roan. I then die-cut a scalloped hole in the tag with the Big Shot and a “Movers and Shapers” die and backed it with a yellow patterned paper scrap. A few cut-out stamps and a hemp tie added the final touch to my personalized gift!
Until next time…
C.
Back from the CHA Summer Show
Why yes, I do remember I have a blog! Not that you’d be able to tell from looking at it. The blog guilt has been eating me alive!
I took a little break to finish up the school year and have some fine family fun during the summer, but as the kids gear up to return to school (AAK! -Already?) I’m gearing up to return to the internet.
Those of you who are crafters may know that the Craft and Hobby Association (CHA) held its summer trade show in Chicago last week. I normally work the show in some capacity as a freelance designer, and this year was no different. I had the opportunity to demonstrate the new Designer Foils, Design Adhesives, and Archival Dye Inks for Clearsnap. Can I tell you how incredibly wonderful it is to work in the Clearsnap booth? It is truly a great company filled with great people (and great products!).
Have you ever volunteered for something, only to think immediately “Yikes! What have I just done?” I did that this week too.
I had the pleasure of meeting Tiffany Windsor, host of Cool2Craft, in Chicago as well. When she had an unexpected cancellation in her Thursday show line-up and came to Clearsnap to fill it, guess who offered to help. Yes, the person who hates the sound of her own voice volunteered to broadcast it live for 8 minutes. Many thanks to Lisa Fulmer for putting me at ease!
My Cool2Craft Clearsnap Foil Segment is about 32:00 minutes into the show.
I also taught three class sessions in the Clearsnap booth. We created a 6×6″ mini scrapbook page filled with stamping, heat embossing, glitter, Smooch Illuminate, Design Adhesives, and a host of other things. I wanted to make sure everyone left having experienced a variety of techniques and products. The classes were videotaped, and will be edited down to a short demonstration to appear on Clearsnap’s website. I’ll be sure to link when it is available, assuming I can stand to link to my own voice again. 🙂


Also thanks to Lisa for taking one of the only photos of me at the show (Demo-ing for Clearsnap at Peterson-Arne). For the first time ever, I didn’t bring my camera to the show. I think I took a few on my iphone, but those were mostly with friends. I came home thinking there wasn’t much that caught my eye, and as I looked around at other designer’s blogs I realized why. There was an influx of vintage at this show. And while I appreciate vintage, I don’t like working with it much. I’m more of a bold and bright girl than a soft and frilly one.
I lean more toward the bright geometrics of the new Echo Park collections and Jillibean Soup’s Atomic Soup collection. These two companies managed to stop me in my tracks and take a second look. And frankly, Atomic Soup is the kind of line a nerdy girl with two biology degrees and a career in crafting can really get behind!
And of course, I loved seeing all my designer buddies again. The show is never long enough to really catch up the way I’d like. And thanks to all those wonderful designers who taught the Monday education classes, I’m excited about taking a new fork in the road!
That’s it for now,
Until next time…
C.
Sizzix ScoreBoards Blog Hop–Rectangle Box
It’s Sizzix ScoreBoards blog hopping time again, this time featuring an adorable rectangle box with a lid! My friend and ScoreBoards designer Eileen Hull sent me this sweet little box to work with and my brain started racing with possibilities.
The box measures 3 3/8″ x 1 3/4″ x 1 7/8″ when it is assembled, which makes it a great size for all sorts of things. While I could have filled it with candies or other treats as a favor box, or kept it for the doodads that collect on my dresser (I was tempted!), I decided it would become an extra-special gift box for the earrings I made for a friend’s birthday.
I wanted to give the box a metallic look with a little bit of texture, so I used Watermark ink, a stamping wheel and clear embossing powder from Clearsnap to emboss a circle design onto the box. After heat setting, I used a paintbrush to rub in Antique Silver Pearl-Ex powder and give the metallic sheen. What I failed to consider, however, is how the metallic would photograph. Whoops! It looks fantastic, trust me! The feet are beads, attached with glue to each corner, and the sentiment is stamped and embossed.
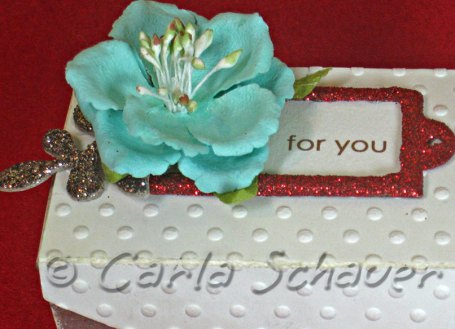
I was super-happy with the dry embossing on the lid that I did using the Sizzix Dots embossing folder and my Big Shot. I’ve never tried dry embossing mat board before, and the results were fantastic. I love it when that happens! A quick embellishment cluster of a printed sentiment, a glittered bookplate and leaf, and a Prima flower finished off the top of the box perfectly. I used a small velcro dot to secure the lid closed. Voila! A special gift box for a special friend!
Don’t forget to hop around to the other artists’ blogs to see the other fabulous takes on Eileen’s ScoreBoards design! If you enjoyed seeing these ScoreBoard projects on the hop, please leave a comment here or on Eileen Hull’s blog so we know you stopped by. This makes you eligible for a random drawing for a ScoreBoards die!
See more projects here:
- Ann Butler
- Candice Windham
- Carla Schauer–“Gift of Friendship” Jewelry Box
- Cindi Bisson –“Unexpected Jaguar” Gift Box
- Eileen Hull
- Einat Kessler
- JGoode Designs— Little box of sunshine filled with hugs
- Julie McGuffee –Life in the Craft Lane
- Veronica Goff
- Laura Bray— Moulin Rouge Theater Box
- Lisa Rojas
- Lorine Mason
- Madeline Arendt
- Melony Bradley
- Michelle Cummings
- Modern Surrealist –Girlfriend’s Gift Box on the Sizzix Blog Hop!!!
- Niki Meiners— Rectangle Box
- Sandy Laipply — Pink Rose Jewelry Box
- Sparkle’s Studio
Stop by again for our next hop on May 12, we will be making cakes!
Until next time…
Carla
It’s a Sizzix ScoreBoards Blog Hop!
Yes, I’m blog hopping again, this time using one of the ScoreBoards Dies from Sizzix, designed my friend Eileen Hull. Looking at the cute little folded Scalloped Box, my immediate thought was that it was the perfect size for holding a gift card. Turns out, I was right!
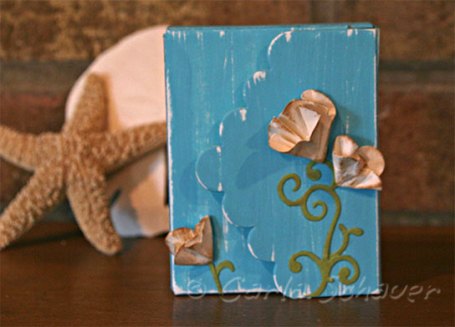
I wanted the box to look beachy, so I turned it on its side, painted it with Americana paint from DecoArt (Indian Turquoise), and sanded it to reveal the white matboard underneath. I also used another Celebrations die (Flower Layers Set #3) to create the beach blooms. After die-cutting, I moistened the paper with water and bent it around the end of my paintbrush to fold and twist the petals. After inking the folded flowers with Creamy Brown ink from Clearsnap, I adhered them using my trusty Helmar 450 Quick Dry Adhesive over stems die-cut using the Flourish Corner die and trimmed apart.
I then painted the inside using Butter paint and sanded it to distress. I painted and distressed an old chipboard tag, added rub-on letters and attached it with my 450 Quick Dry. I slipped in the gift card, added some sticky velcro, and POOF! Dressed up gift card.
Hop over to the blogs of some fellow craft designers to see what they created with the “Box with Scalloped Flap and Flowers” die. When you are finished, hop back to Eileen Hull’s Blog (or if you get lost, she has the master list) and vote for your favorite project. The winning designer will win the die that made this gift card holder. Don’t forget to leave a comment here or on any other participating blog for a chance to win a die from Eileen’s first collection!
Thanks for “hopping” by, and here are the rest of the links!
Bonnie Bruns
Candice Windham Designs
Cindi Bisson- Fat Cat Creations
Craftside-A behind-the-scenes peek at a crafty world
Designs by Roxi
Jenn Ellefson
Just a Thought or Two
Jen Goode
Julie McGuffee
Karen Burniston
Laura Bray
Lisa Rojas
Marisa Pawelko- Modern Surrealist
Michelle Cummings
Melony Bradley
Niki Meiners
Pink Lemonade
Sandy Laipply
Sparkle Studio
Veronica Goff
Carla Schauer Designs
Brenda Pinnick
Until next time…
Carla
